Intro
Row Level Security is a technique to have a user see only a part of the data in the report. The report is automatic filtered based on who is viewing the data.
With Row Level Security (RLS) you can only limit the rows a specific user can see, not the columns.
There are basically two ways to set up Row Level Security (RLS). Both methods require a field in the dataset that can be used to filter the data for the specific group or user.
Static Row Level Security
Static RLS is easiest to set up and is best to used when there is only a small number of different and distinct groups to configure. This method requires the data to contain a field which can be filtered to create the subset of data for a specific group.
Dynamic Row Level Security
Dynamic RLS is more complicated to set up and is best to used when there are many groups to configure or when the groups frequently change over time. This method requires the data to contain a field with the username to filter the data.
The best way is to have a table with the ID’s of the employees with the logins they use for Outlook. These are the credentials in the format of an email address and might look like: John.Doe@sogeti.com. It is best is to have this table pushed from a source system to avoid the burden of having to maintain this table yourself.
Close the backdoor
Before you can start on working with Row Level Security you have to make sure the users do not have access to the underlying data source itself. To accomplish this there are two things that need to be considered.
Limit access to the data source itself
Do not give the end users access rights to the data source and use different credentials to connect to the source. Use a functional account or service account to connect to the data if necessary.
Limit access to the Workspace
When users are able to edit the report in the workspace they can alter the setting for the Row Level Security and thereby disable the Row Level Security. This is especially important if the report contains sensitive information like details on individual customers or on individual employees.
Set the workspace to the following settings:
- Assign users that require the RLS to the View role
- Members of the other roles can bypass the RLS
Or publish the workspace as an app. This is the prefered method for sensitive data or large user groups.
Review the setting for each workspace type as this is important to prevent users from editing the report and alter the setting for the Row Level Security.
Static Row Level Security
Prepare the model for Static Row Level Security
To set up Static Row Level Security you first need to select the field you can filter the data on. The table this field is part of must have a relation to the other tables that hold the data that has to be filtered.
Create Roles
Select from the Modelling ribbon under Security: “Manage Roles”

Create at least two roles. One role that will be used for Administrators. People assigned to this role are unaffected by the Role Level Security. This Role can be used to assign to a select group of functional managers and administrators if needed.
Add additional roles for every group that needs a different view of the dataset. Navigate to the table with the field that needs to be filtered and enter the DAX expression to filter on the appropriate value:
[Region] = "International"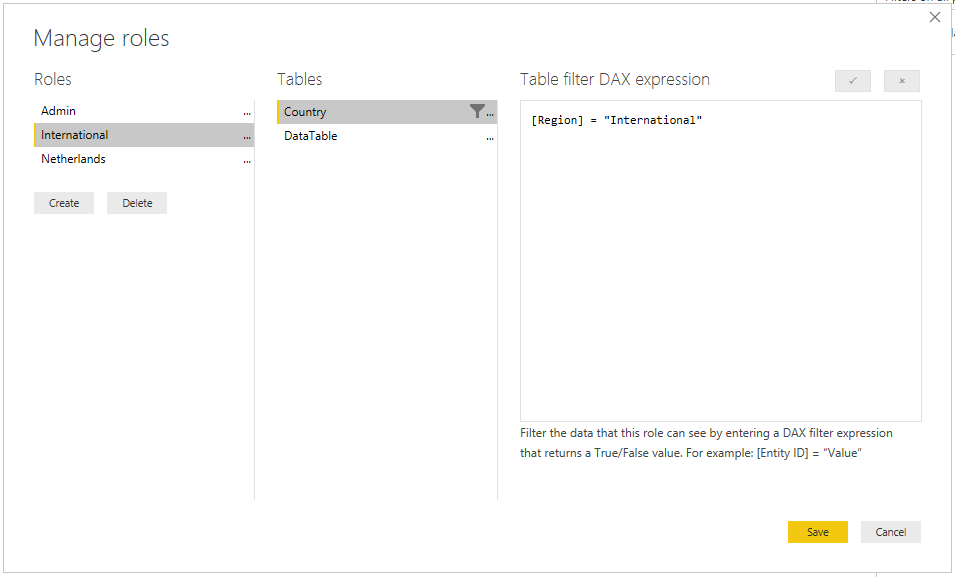
Repeat these steps for every Role that needs to be filtered.
Keep the DAX expressions simple
You can make these expressions as complicated as you want. However, it is a good practice to keep the DAX expression as simple as possible. Push down complex logic to the database, Power Query or as a calculated columns. This will save you time when debugging the Row level Security, especially when users claim they are not seeing the correct data.
Testing the static filter
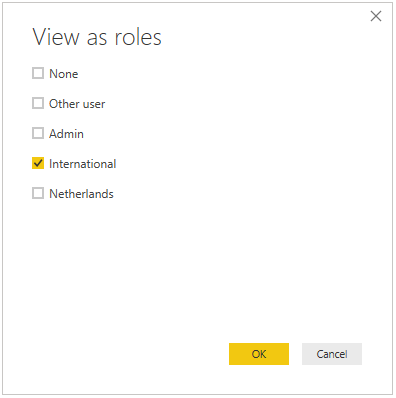
To test the filter in Power BI Desktop select “View as Roles” and select only the role that you want to view.
Publish to powerbi.com
When the Row Level Security works as expected, you need to publish report to powerbi.com
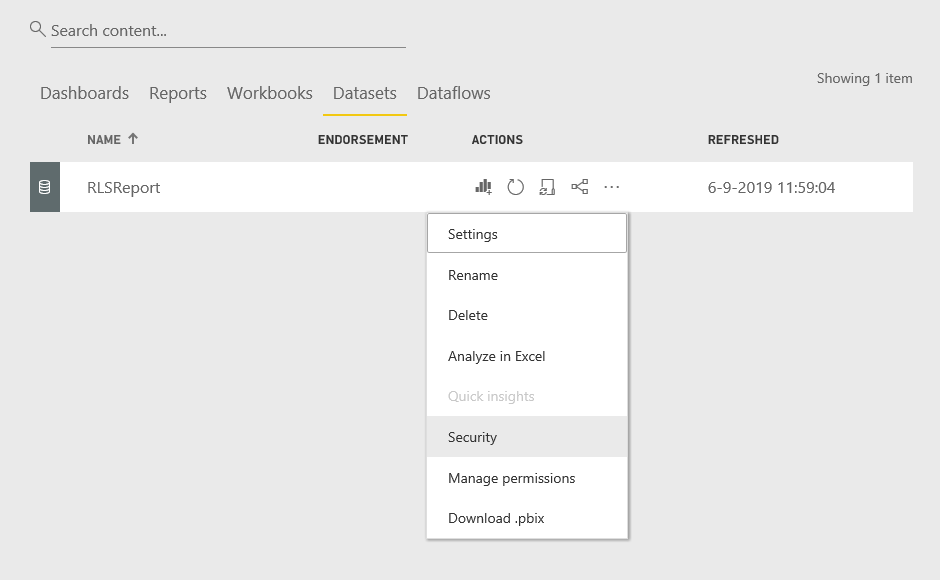
The last step is to assign users to the roles that just have been created. Go to the dataset (not the report!) and select the menu from the 3 dots. Click on Security.
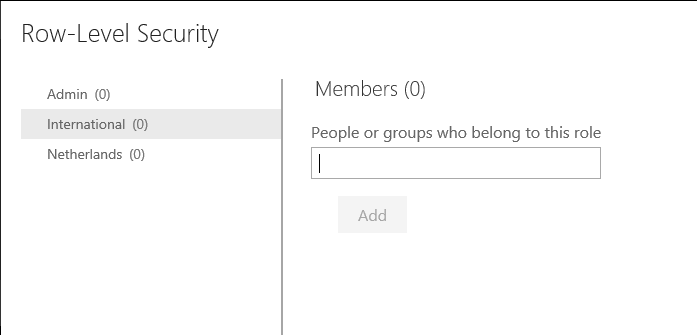
Assign the groups or users to the roles. Avoid assigning rights to individual users but use Groups whenever possible. This will save you from the hassle to have to maintain the users yourself. It is considered a good practice not to use mailing lists or distribution lists as for many organisations these groups do not comply to the regulation in order to be used to give access to for sensitive data.
Use AD groups if possible
AD groups can be reused in multiple reports and also be used to give users access to the report itself. In larger organisations, special IAM (Identity Access management) departments are assigned to control and monitor these AD groups. It can take some time to get everything set up, but it saves you time in the long run as you do not have to add and remove users to the RLS roles.
When your organisation has to comply to certain legislation, the access and RLS can be subject to audit controls. These audit controls are much easier when using AD groups that are centrally managed by an IAM department.
Dynamic Row Level Security
Prepare the data model for dynamic RLS
Setting up Dynamic Row Level Security requires some preparing. First import a table that includes the names of the users that will be granted row level bases access to the data. This table needs to be connected to the table holding the data. This can be through intermediate tables.
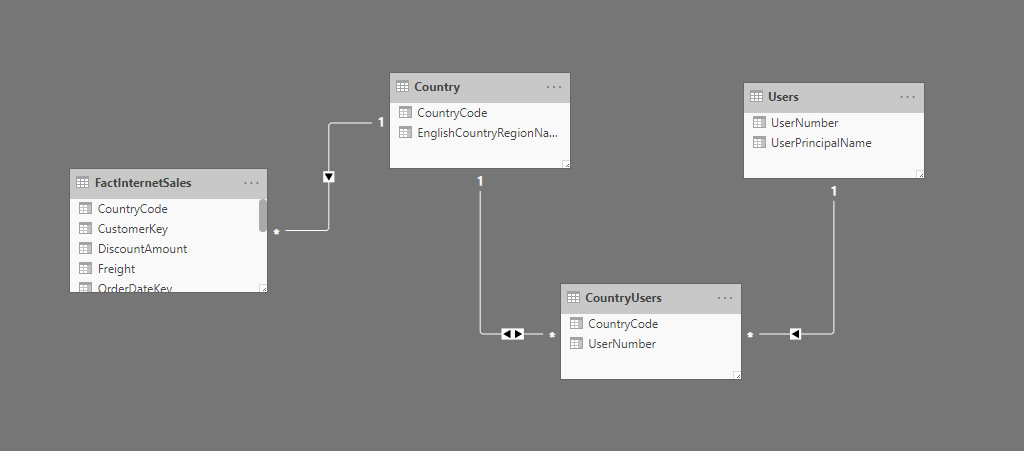
In this example the table Users contains the list of users and the table CountryUsers contains the countries a specific user is allowed to see. The tables Country and FactInternetSales hold the Country dimension and fact table respectively.
Make sure you specify the filtering direction “Both” in a 1-to-many relation when the RLS filtering is on the many side of the relation. Also mark the checkbox for “Apply security filter in both directions”. In our example that would be the relation between the tables Country and CountryUser.
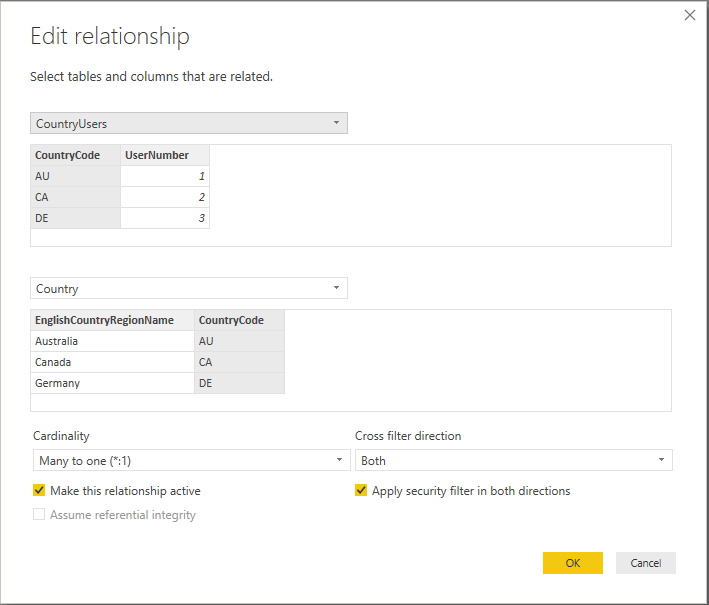
The tables for CountryUser and User can be joined to one table to improve the performance. To make the example easier to understand the two table are kept separate.
Power BI might give you a warning when creating a bidirectional filter on a one-to-many relation. As for most of the one-to-many relations one way filtering is the best option, in this situation bidirectional filtering is needed to enable RLS. So you can ignore this message.
To present a cleaner model to the users you can mark the tables involved in the mapping to the users accounts as “Hide in Report View”. In our example that would be the tables CountryUsers and Users.
Create Roles
Select from the Modelling ribbon under Security: “Manage Roles”.

Create at least two roles. One role that will be used for Administrators. People assigned to this role are unaffected by the Role Level Security. This Role can be used to assign to a select group of functional managers, auditors and administrators if needed.
The second group will be used for the users that should use the Role Level Security. In our example this is the group RLSUsers. Navigate to the table with the users and set the following DAX expression to filter on the current user:
[AccountName] = userprincipalname()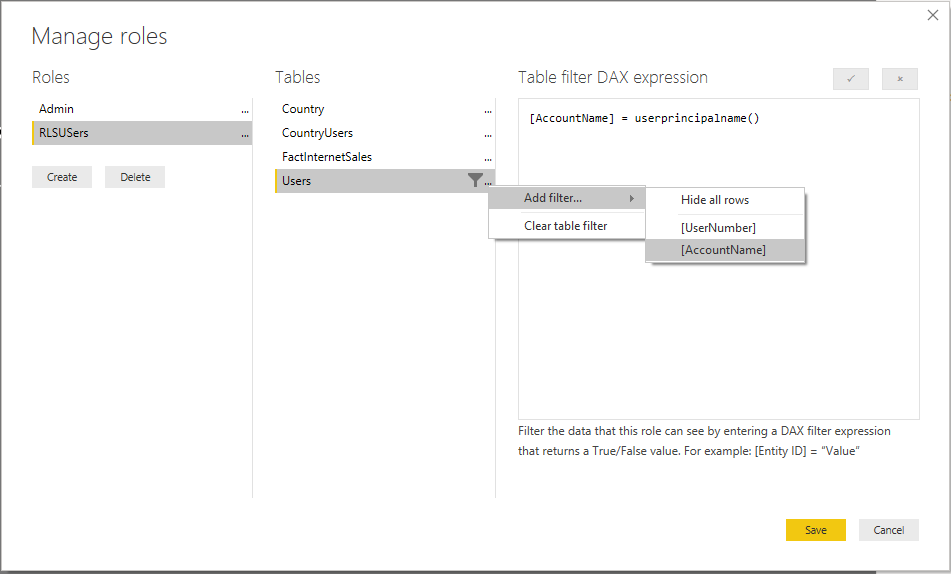
Testing the dynamic filter
To test the filter in Power BI Desktop select “View as Roles”. Specify the user you will test with as “Other user” and select the role that hold the dynamic filer.
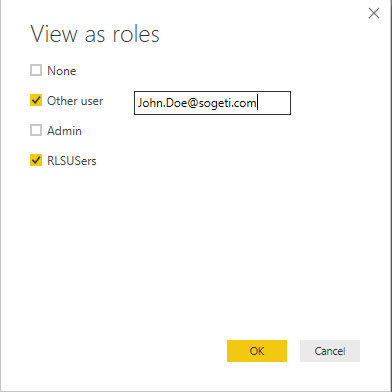
The data should show only the records that the user is entitled to see.
To check if the data is filtered correctly for this user you can add a visual of the type table that holds only the field that the filter is applied to. In our Example that would be Users[AccountName]. You can see if the selected user is the only user in the selection. You can do the same for any of the intermediate table between the Fact table and the table with the dynamic filter to assure the filter will correctly flow through the relations.
In our example the visuals would look like this:

Difference between email and UserPrincipalName
Power BI looks for the AD property “UserPrincipalName” and not the email adress. In most cases these are the same but it can be different. Organisations with a history of mergers, rebrandings and/or reorganisations are more likely to have a UserPrincipalName that differs from the email address. Also Power BI Desktop is connecting to the on-prem AD and Power BI service is connects to the Azure AD. This can also give different results when testing in Power BI Desktop and on the Power BI Service.
Publish to powerbi.com
When the Row Level Security works as expected, you need to publish report to powerbi.com.
The last step is to assign users to the roles we created. Go to the dataset (not the report!) and select the dots. Click on Security.

Assign the groups or users to the roles. Avoid assigning rights to individual users but use groups whenever possible. This will save you from the hassle to have to maintain the users yourself. It is considered a bad practice to use mailing lists or distribution list. In many organisations these groups do not comply to the regulation required to give access to sensitive data.
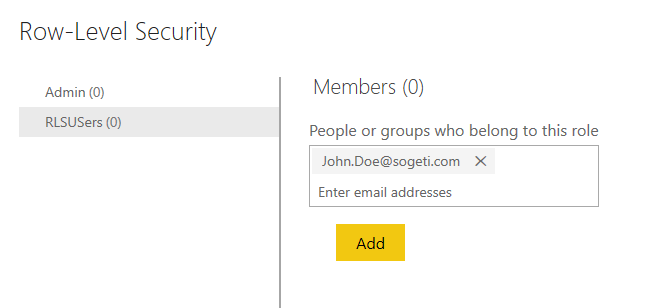
Be aware that working with Power BI Desktop and in de Power BI Service (app.powerbi.com) can show different results when looking for accounts and groups.
For more information on RLS : https://docs.microsoft.com/en-us/power-bi/service-admin-rls

