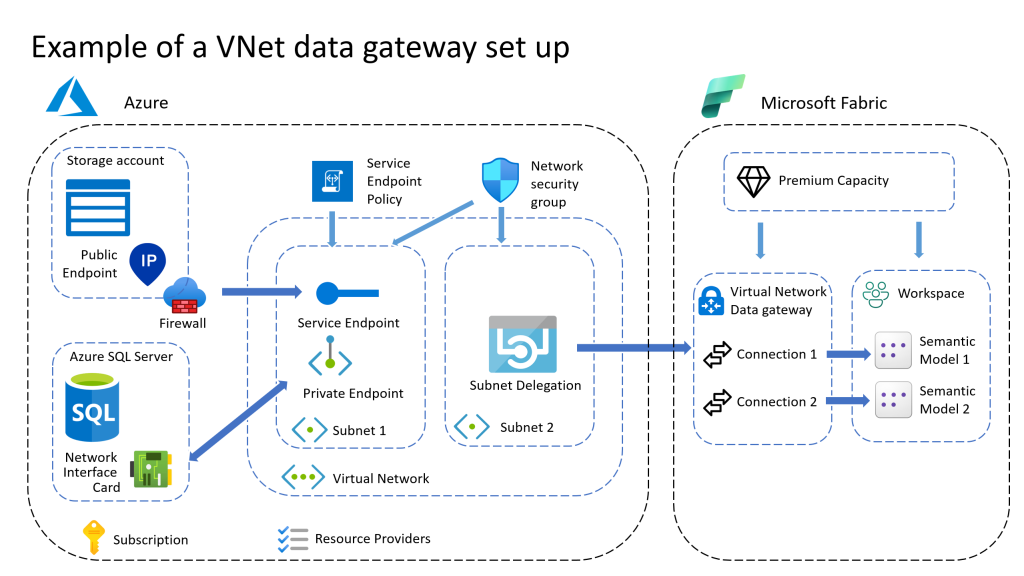
On 1 February 2024 the Virtual Network data gateway has been made General Available (GA). With the change to GA, also some settings of the VNet data gateway have changed. Now the VNet data gateway has to be assigned to a Premium or Fabric Capacity.
Prerequisites
Before creating or making changes to an existing VNet data gateway check if the following items have to be created:
- Premium capacity (P) or Fabric capacity (F).
- Azure Virtual Network with the data source connected.
With the minimum set of permissions of:
- Role “Network Contributor” on azure VNet.
- “Microsoft.Resources/subscriptions/resourceGroups/read” on the Resource Group.
- Additionally Contribute on the subscription for step 1 if needed.
- Contributor or admin permissions on the capacity.
The first two steps are done in the Azure portal (portal.azure.com), step 3 is done in the Fabric portal (app.fabric.microsoft.com).
Create a VNet data gateway
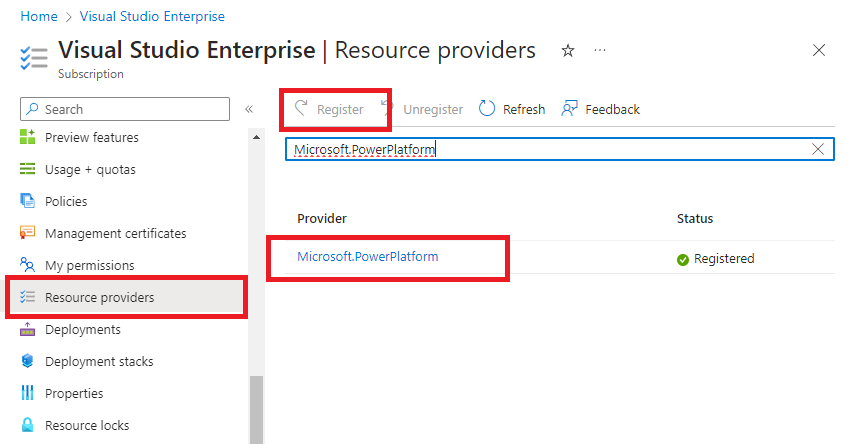
Step 1: Register Microsoft.PowerPlatform as a resource provider
Registration of the resource provider is only an one-time configuration at the Azure subscription. On the Azure portal, sign in as a subscription owner or contributor and register Microsoft.PowerPlatform as a resource provider for the subscription that contains the VNet. This change enables your subscription to work with this resource provider.
- Sign in to the Azure portal.
- Navigate to the specific subscription.
- Select Resource providers.
- Search for and select Microsoft.PowerPlatform, and then select Register.

Step 2: Create a subnet for the VNetdata Gateway
This subnet should have connectivity to the data service.
- Sign in to the Azure portal.
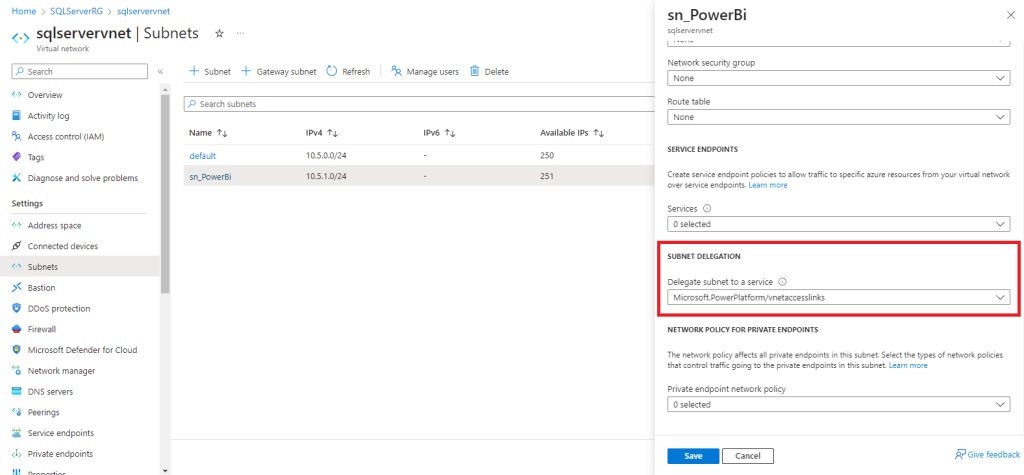
- Add a new subnet in the VNet. This new subnet can’t be shared with other services, but will be used entirely by the Virtual Network data gateway. However, the subnet can be used to connect multiple VNet data gateways.
- Reserve space for10 IP addresses for the first VNet data gateway and additionally 5 IP addresses for every extra VNet data gateway added to the subnet.
- Select Microsoft.PowerPlatform/vnetaccesslinks from the subnet delegation drop-down list.
- Select Save.

Please take note:
• Don’t use the subnet name “gatewaysubnet” as this is a reserved word for the Azure Gateway Subnet feature.
• Make sure this subnet doesn’t have an IPV6 address space added.
• Make sure the subnet’s IP range doesn’t overlap with 10.0.1.x.
Step 3: Create the VNet data gateway
A Microsoft Power Platform user enables the subnet for use in Microsoft Power Platform and creates a VNet data gateway. By doing this process, the user authorizes the Microsoft Power Platform VNet service to inject containers into the subnet. The user also needs to have the Azure Network Contributor role in the subscription to be able to perform this action.
- Sign in to the Power BI homepage.
- In the top navigation bar, select the settings gear icon on the right.
- From the drop down, select the Manage connections and gateways page.
- Select Virtual network data gateway > New.
- Select the license capacity, subscription, resource group, VNet and the Subnet. Only subnets that are delegated to Microsoft Power Platform are displayed in the drop-down list.
- Provide an unique name for this data gateway. Start the name with an indication of the project or department so the Fabric Admins can easily find it in case of support.

- Select Save. This VNet data gateway is now displayed in your Virtual network data gateways tab. A VNet data gateway is a managed gateway that could be used for controlling access to this resource for Power platform users.
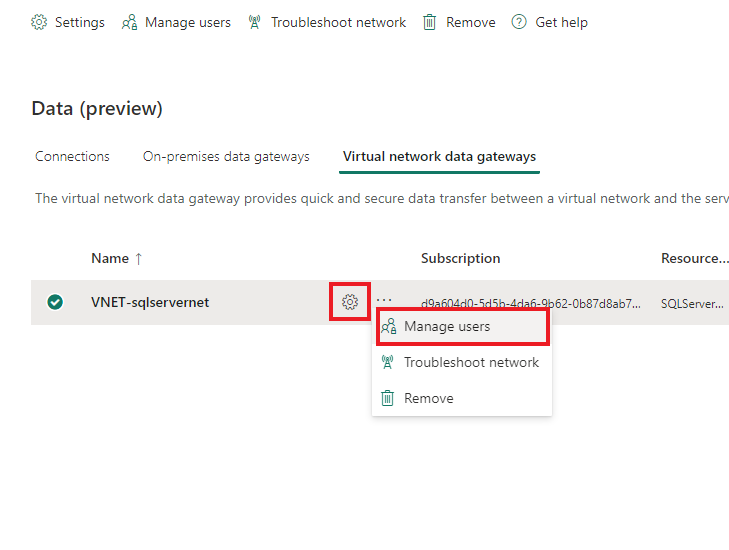
- Click on the 3 dots next to the name of the new VNet data Gateway and select Manage users. Add any additional users or service accounts that need to be able to create connections on this VNet data gateway.

Step 4: Create connections
On the new VNet data gateway, connections can be created in the same way as on any on-prem data gateway.
Manage the VNet data gateway
To change the capacity or change any advanced option, minimum permissions needed are:
- Role “Network Contributor” on the azure VNet.
- “Microsoft.Resources/subscriptions/resourceGroups/read” on the Resource Group.
- Contributor or admin permissions on the capacity.
- Admin role on the VNet data gateway.
To remove a VNet data gateway minimum permissions needed are:
- Role “Network Contributor” on the azure VNet.
- Admin role on the VNet data gateway.
For all other changes the admin role on the gateway is sufficient.
More on managing VNet data gateways look at Manage data Gateways. (Manage virtual network (VNet) data gateways | Microsoft Learn)
Custom role for PowerPlatform VNet Contributer
In order to create a VNet data gateway permissions are needed on both a Premium / Fabric capacity and on the Azure resources of the Virtual Network. This can be challenging if both resources are maintained by different teams. In that case, create a custom role at the subscription level with the following settings:
RoleName:
PowerPlatform VNet Configurator
Permissions:
Microsoft.Authorization/*/read
Microsoft.Network/*
Microsoft.Resources/subscriptions/resourceGroups/read
Assign this role at the resource group to the capacity admin and let her/him create the VNet data gateway.
Currently it is not possible to create or manage a VNet data gateway with the use of the REST API as this API is not available yet.
Connection data sources to the Azure VNet
There are two ways to connect an Azure data source to the Azure Virtual Network
Service Endpoint
- Easier to set up
- One way connection
- Connects to public IP address of the data source
Private Endpoint
- More complex to set up
- Connection works two ways
- Connection is more secure
Service Endpoint
A service endpoint actually is not a real connection, but a set of configurations that allows the virtual network to connect to the data source. The connection is made to the public endpoint of the data source. The VNet can connect to the data source, but the data source cannot connect to resources in the VNet itself.
For an service endpoint to work both the VNet and the data source have to be configured to allow for the connection
Configure the VNet:
- In the azure portal select the virtual network
- At Subnets, select the subnet
- At “Service Endpoint” select the services to connect to
This configuration allows the subnet to make a connection to ALL resources of the type selected. To limit the access to specific data sources add a “Service Endpoint Policy” and a “Network Security Group” to the subnet.
Configure the data source:
- In the azure portal select the data source.
- Select the Security – Networking pane.
- Select “Public Access”.
- Add a virtual network rule pointing to the virtual network and subnet.
- Make sure the subnet for the VNet data gateway is selected. Only traffic from the selected subnets is allowed to connect to the data source.
Private Endpoint
A private endpoint is a direct connection between the data source and the VNet. The data source has its own IP address inside the virtual network. This makes it possible for the connection to work both ways. Because a Private endpoint add a new IP address to the data source, the public endpoint is not used. This makes this connection more secure and also helps in turning off the use of the public endpoint.
It is a best practice to also add a “Network Security Group” to the subnet for addition security.
Configure the private endpoint:
- In the azure portal select the data source.
- Select the Security – Networking pane.
- Select “Private Access”.
- Add a private endpoint.
- Provide the name for the private endpointand and clikc next twice.
- Select the virtual network the VNet data gateway is connected to
- Select the subnet to connect to. The private endpoint has to be in a different subnet that the subnet the VNet data gateway is connected to as this subnet is reserved for the VNet data gateway.
- Review and create the private endpoint
For more information on creating private endpoints, see link Create private endpoint.
An overview of the existing private endpoints can be found in the Private link Center.


